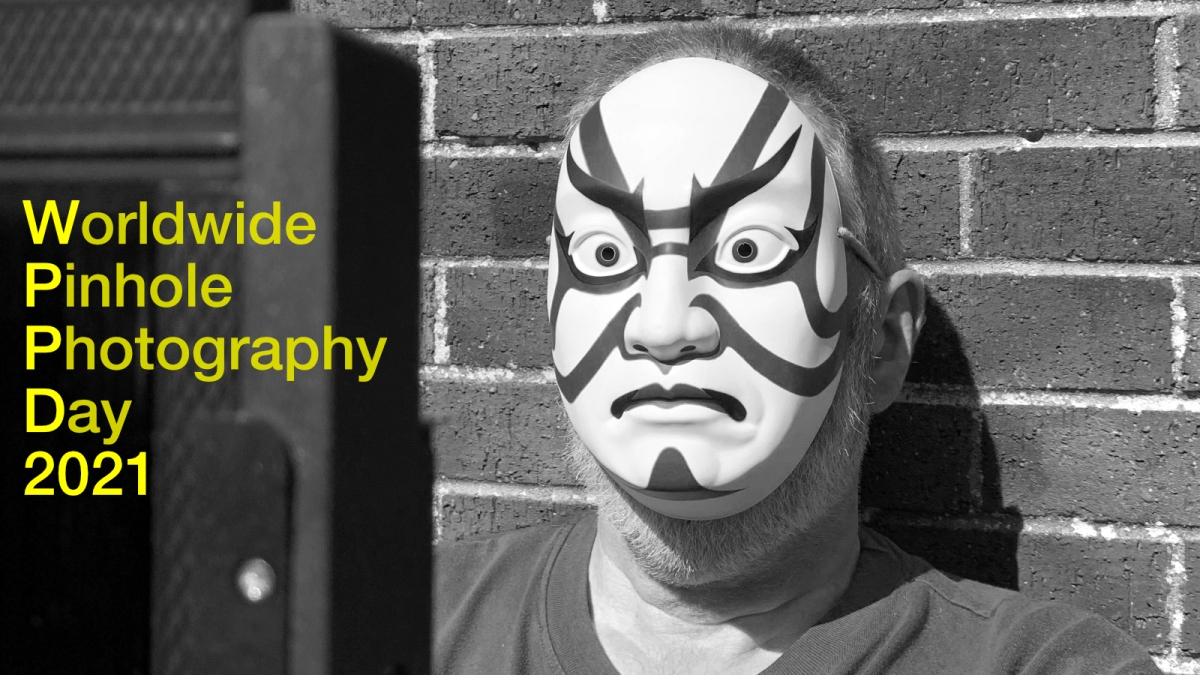
After a year of lockdowns, it seemed the appropriate thing to do for Worldwide Pinhole Photography Day, 2021.
Just as last year one month or so in to the coronavirus pandemic, I wanted to celebrate WPPD2021 as a memory of it one year on.
My daughter and her husband had returned from their belated honeymoon in Japan just days before the pandemic struck and had brought me back a Japanese face mask as a present. It hangs on the wall of my darkroom and as I turned my mind to this year’s Pinhole Day, the mask kept looking back at me as if to suggest I should use it as the focus (ha!) of my attention.
After a year of lockdowns, staying local to home and mask wearing when out, I decided to use the mask as a prop and to stray no further than my rather dilapidated garden shed. A memory of confinement … and masks.
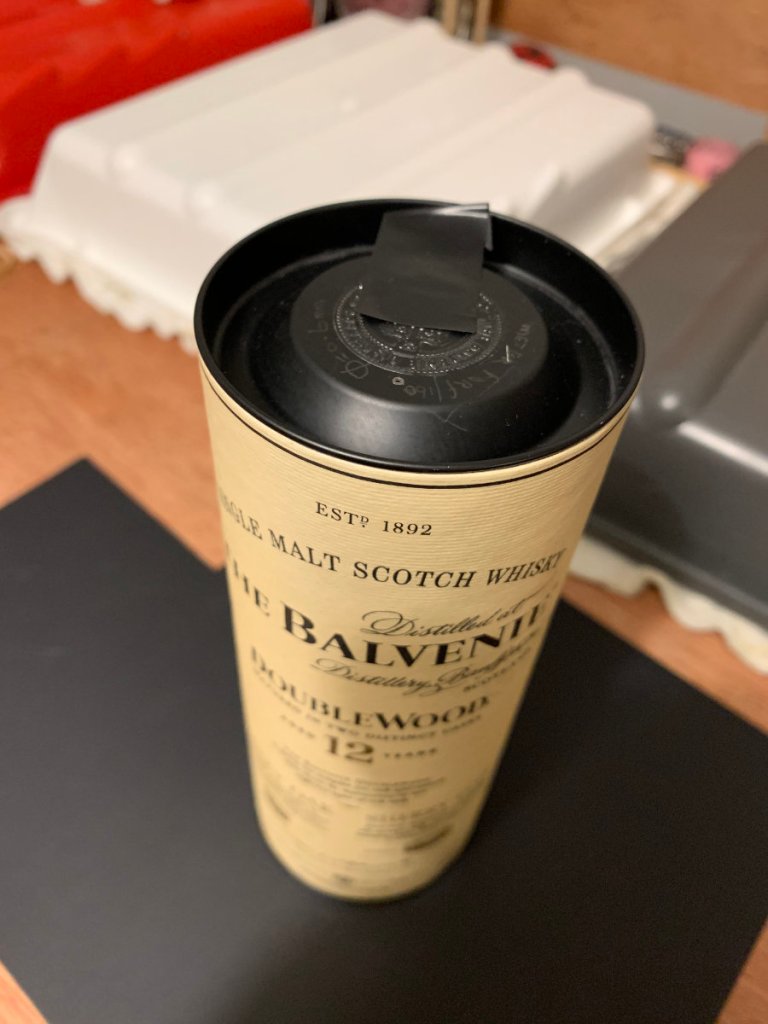
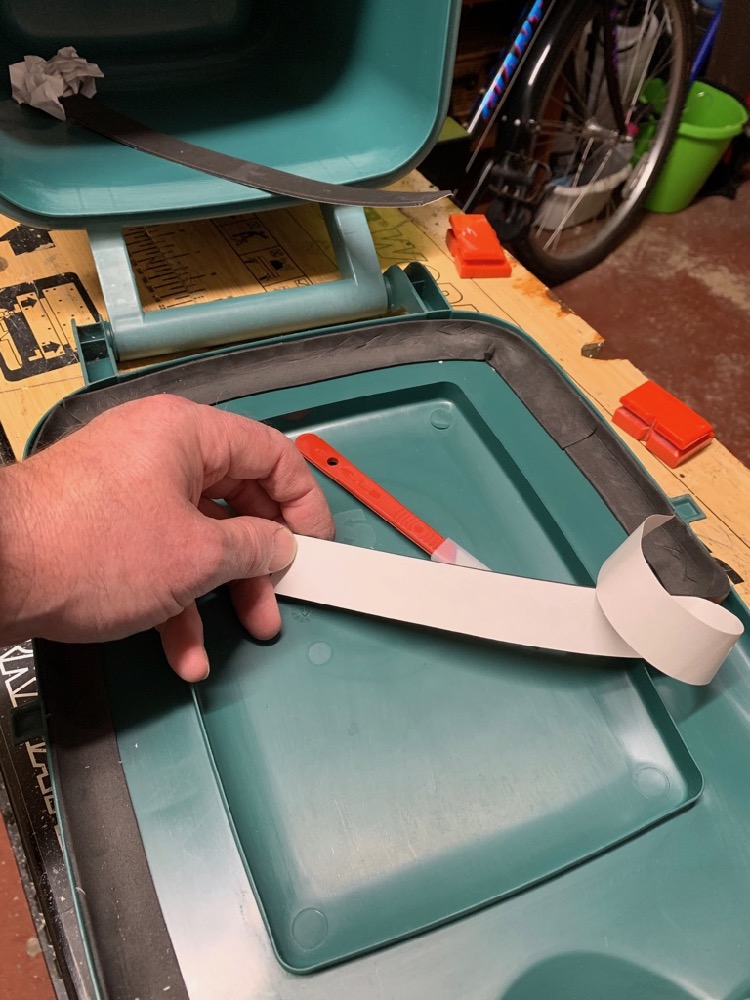
I chose to use existing pincams this year: My Harman TiTAN pincam, a tin can and a foamcore ‘box within a box’ each with regular pinholes, a multi-pinhole wooden block pincam that I wasn’t sure I’d ever managed to get a result from, and an empty whisky bottle carton with a pinhole in the lid to make an anamorphic pincam. My choice of media was Ilford FP4+ sheet film, MGFB Glossy paper and Direct Positive paper.
I prepared the cameras the evening before and made out a list with the exposure times I could expect each to need for likely light conditions. On the day I added brief notes of subject and actual exposure times:
Pincam list
The day was forecast to be bright and sunny and didn’t disappoint. Indeed it was almost too bright and a couple of the shorter exposures were difficult to achieve with any accuracy, pincam shutters being nothing more than a lens cap or a strip of electrical tape!
As I hadn’t strayed further than the back garden, I had plenty of time to develop the film and paper before the day was done. I was happy with all of the FP4+ negatives and proceeded to print them the following day. The multi-hole wooden block pincam leaked so much light that the direct positive print was unusably overexposed, much as I had expected!
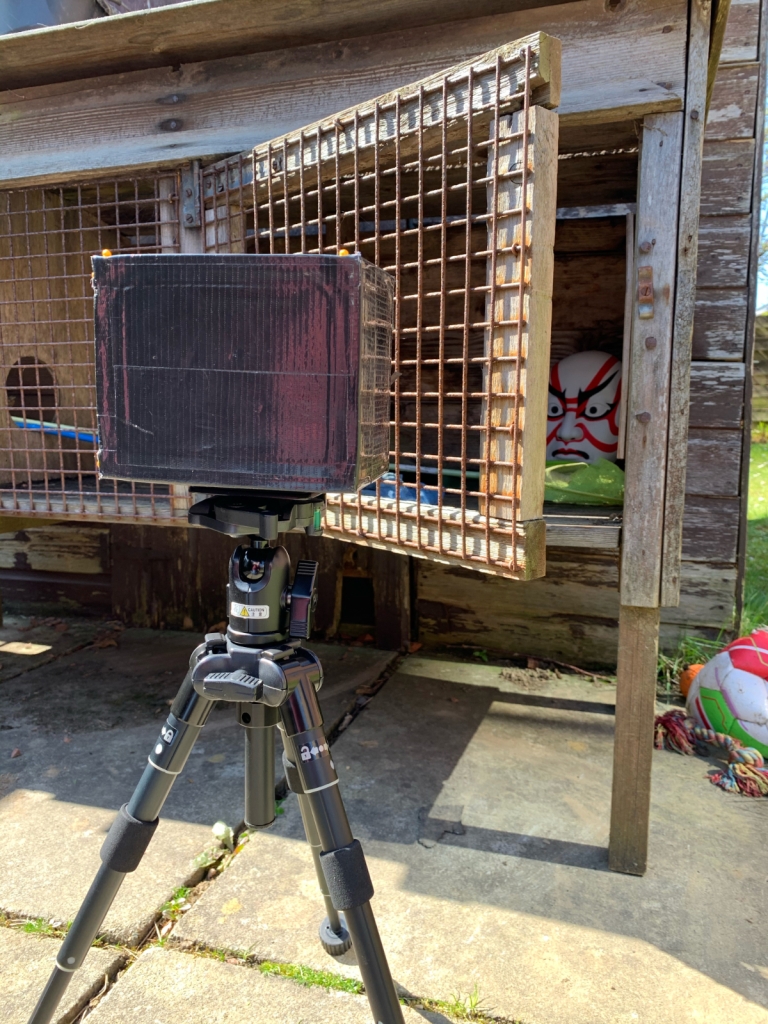
I was particularly disappointed that the anamorphic image from the whisky bottle carton was completely overexposed and unusable. I’d hoped to use it as my submission to the WPPD2021 online gallery. It was 8:30 pm when I pulled it out of the developing tray, far too late to retake the shot. However, I quickly set up the pincam on a tripod, attached a light and pointed it in the direction of the mask, now hanging in its usual spot on my darkroom wall. It took a 26 minute exposure to get an image that I was pleased enough with (I could have framed the shot better) … and the exposure was made on Pinhole Day!
Without further explanation here are my images from the day, all printed on 8 x 10 Ilford MGRC Pearl paper.
Tin of Denial, FP4+, 0.4s (or thereabouts!)
Wood block multi-pinhole and The Balvenie anamorphic pincams … lessons to be learned!
Black Box foamcore pincam, FP4+, 2m 25s exposure
TiTAN pincam, FP4+, 30s exposure
TiTAN pincam, FP4+, 49s exposure
TiTAN pincam, FP4+, 0.5s exposure
TiTAN pincam, FP4+, 15m exposure
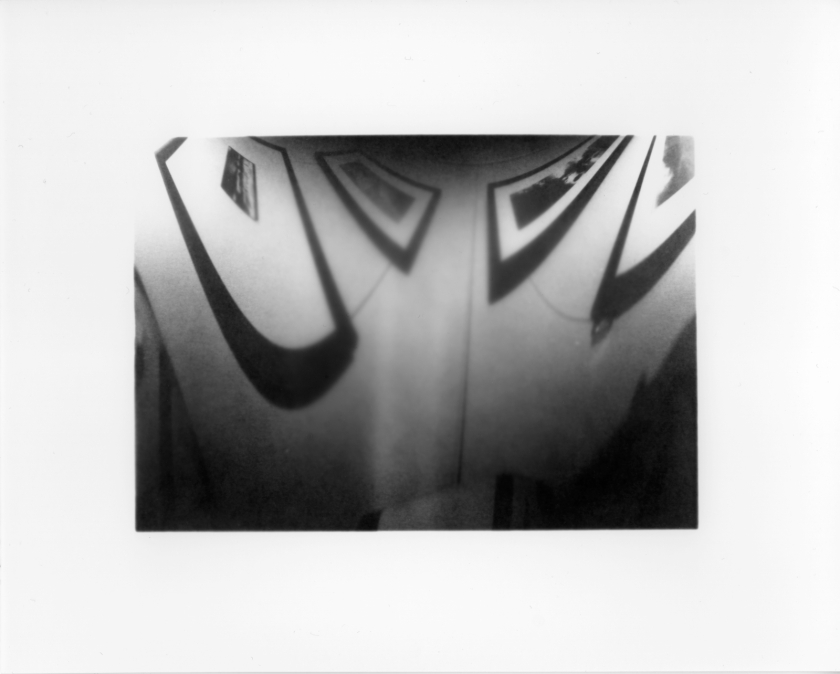
The Balvenie anamorphic pincam, MGFB Glossy, 26m exposure
It took a rather wet and dull day when what daylight there is at this time of year seemed unwilling to make any appearance whatsoever, to get me back into my darkroom.
This has been the year of coronavirus. I have made very few photographs and despite my intentions have found the darkroom an unappealing place to be. The weather during the early months of the year wasn’t great for photography, but I had taken advantage of what opportunities arose and did expose a few rolls of film. With a looming lockdown I’d ordered supplies of chemicals and paper with every intention of spending time developing and printing in my darkroom. In the event, lockdown brought beautiful weather and the restrictions on movement were relaxed to allow taking exercise outdoors. I chose to spend what time I could out on my bicycle. But most times the only ‘camera’ I took with me was my mobile phone. On my bike I was freed from the darkness of lockdown and I found myself not wanting anything that would lead me to the darkness and solitude of the darkroom.
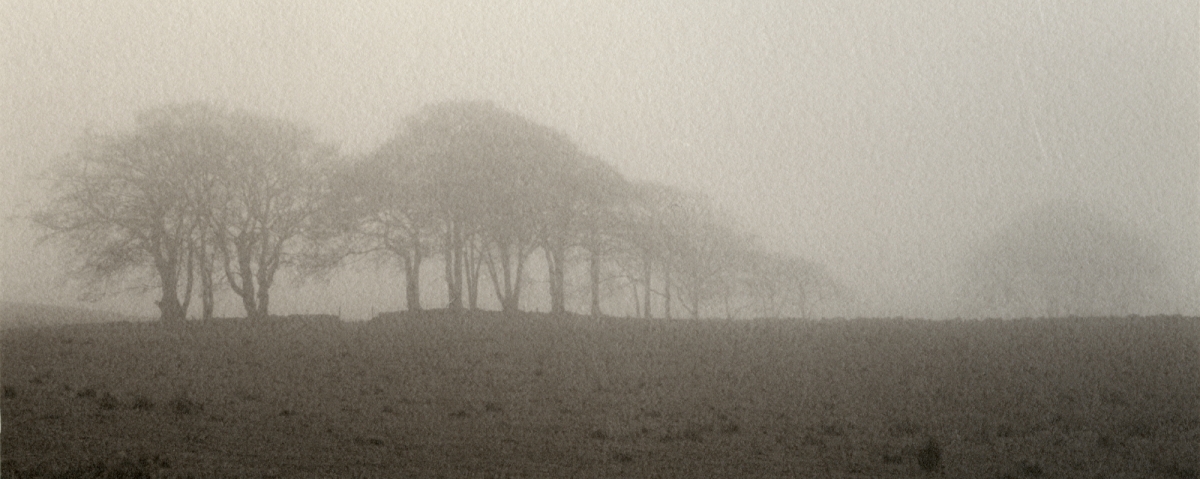
The threat of coronavirus is far from over but with the short, dark days of winter there is less opportunity for escape on the bike and there seems less to lose by spending time in the darkroom. Which is what I did last weekend, setting out to print and tone one negative exposed just before lockdown and another exposed just a couple of weeks ago when unusually, I had taken a camera with me on a misty morning cycle ride.
Both negatives have been printed on Ilford MG ART300 paper and selenium toned. These are scans of the final prints:
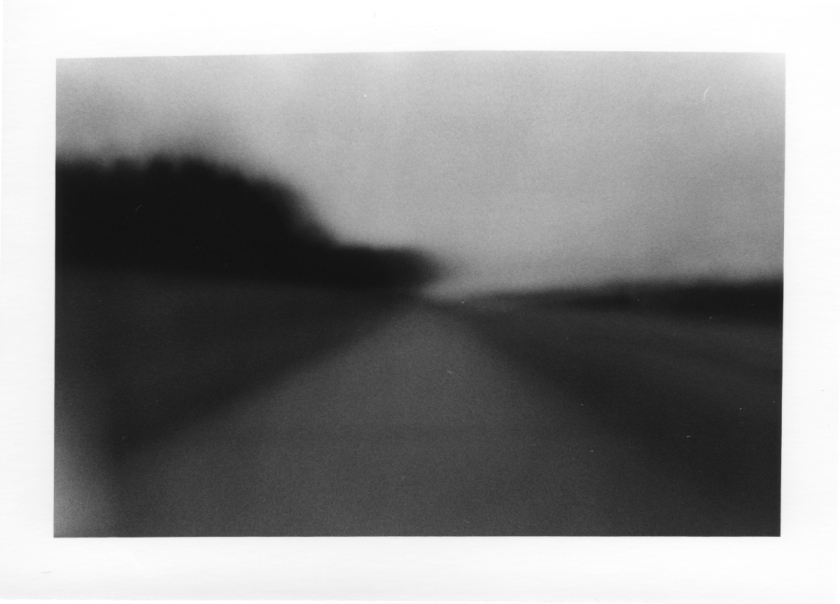
Made in early March 2020 on Kentmere 400 film in an Olympus OM1n camera fitted with a bodycap pinhole. The camera was mounted on a forward facing bike rack and the exposure made as I cycled through the landscape. This is my most recent iteration and refinement of my process of creating what I call ‘timescapes’. I chose to print this image as it seems to me prophetic of the dark days and twists of the unknown that lay ahead.
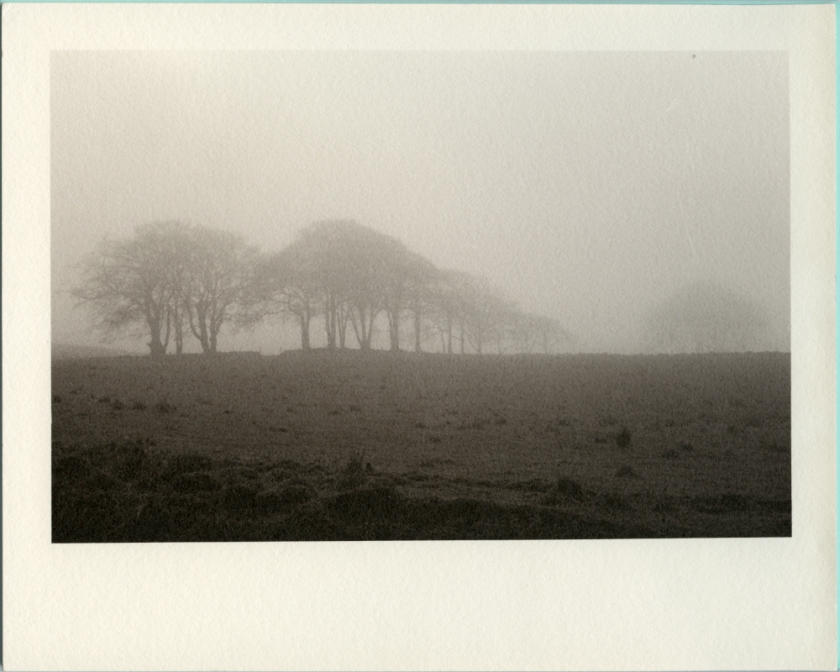
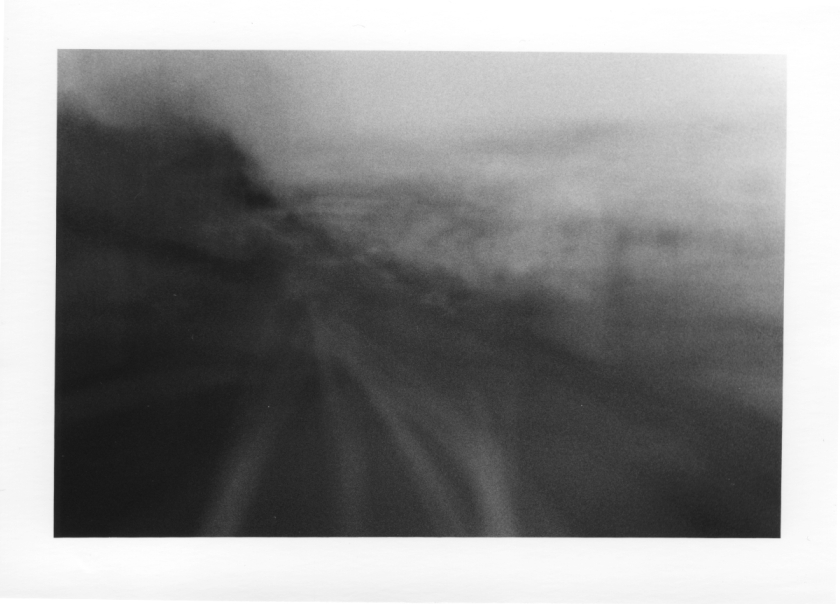
Made in mid November 2020 on Ilford Ortho Plus film in an Olympus Trip camera. During this period of lockdown guidance advised not to cross the county boundary in which I live. On my (almost) daily cycle rides I had taken to ride as far as I could without crossing into a neighbouring county. The still, misty morning with the mist forecast to burn off persuaded me to pack the camera and take a route that skirted the western county boundary. This is as far as I could go and looks west, the trees and hills beyond disappearing into the murk. Even as I made the exposure and took in the scene for a while after, those trees and hills were becoming slowly more visible as the light and warmth from the sun overcame the and burnt off the mist. This is an image that gives me hope of the dark days of 2020 being ended and of light being restored.
2020 has been (still is!) a very strange year indeed. Lockdowns and restrictions on movement and interpersonal contact have affected everyone and I guess I’m no different.
Since Pinhole Day at the end of April I’ve hardly entered my darkroom. Any other time it is a haven of peace in the comfort of the red safelight while I enjoy dabbling with my photographic efforts. But it’s a Dark Room. I sought light and the company of others, albeit at a distance.
On the first day of December I set up my TiTAN pinhole camera at a south-facing window, opened the aperture to admit light on to a sheet of Harman Direct Positive paper and left it exposed for twenty four hours. Once done, the paper was developed as normal to reveal the solarized image of the sun’s path for the time that it appeared, low in the sky.
Even in the dark months of winter in this strangely dark year, light shines on.
With just one week until Worldwide Pinhole Photography Day 2020, I’ve been dusting down old and creating new pincams.
WPPD2020 is almost upon us! This is its twentieth year and will be celebrated across the globe in a variety of coronavirus lockdown conditions.
Six months ago I set up solargraph pinhole cameras at four locations. One was vandalised about five weeks in and I took down another after three months to check that an image was being recorded as I would expect. The remaining two should each have a 6-month record of the sun’s path as seen from each of my daughters’ homes. Lockdown means I may not be able to retrieve the cameras and will have to rely on my daughters closing the shutters for me.
With thoughts of possibly not having one of my planned images to upload to the WPPD2020 website gallery, I’ve been thinking of alternative pincams to use on the day and testing out a few ideas.
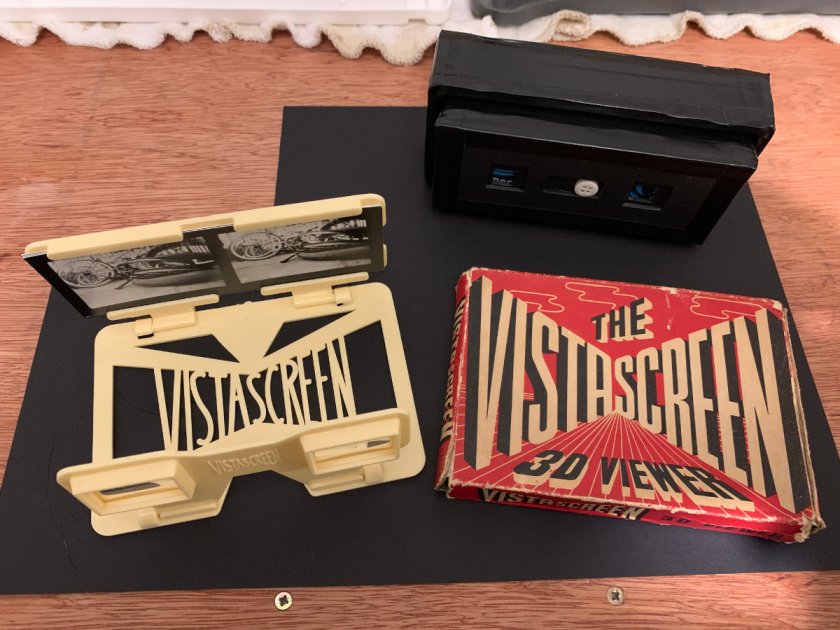
Just before Christmas 2017 I received the gift of a vintage VistaScreen 3-D viewer and over that holiday period I made a stereo pinhole camera. Here it is with some of the prints I’ve made from the Ilford MGRC paper negs I exposed over the past couple of days: (To see the 3-D effect, stare at each dual image in turn and slowly cross your eyes to create a virtual third image in the middle)
Another possibility might be to take my Food-Caddy Bincam pincam for a spin. Here it is with an image made on Harman Direct Positive Paper while cycling with the camera mounted on the rear rack of my bike:
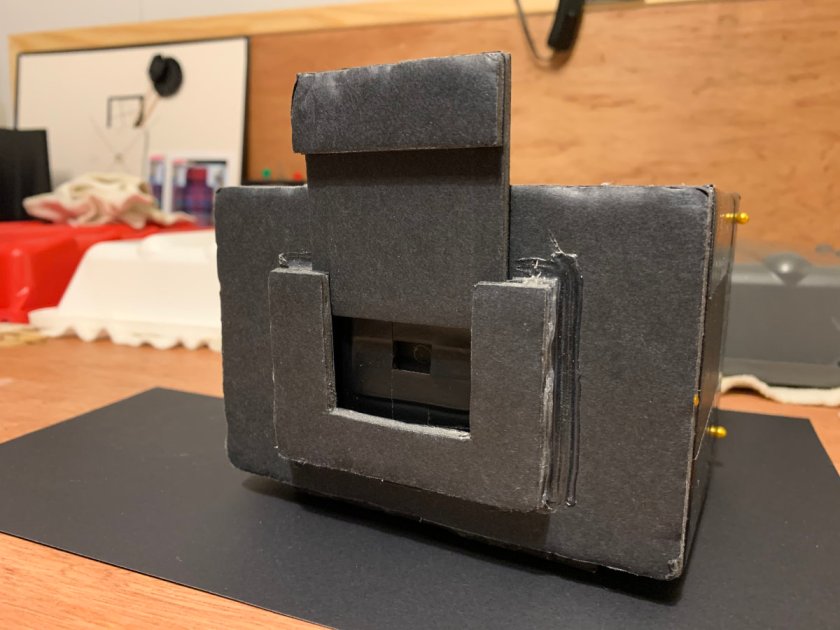
Or I could go back to one of the first pincams I ever made. This foamcore box-within-a-box pincam was made for WPPD2014 and is one of my favourites. I gave it a go last week with some Harman Direct Positive Paper:
Lockdown hasn’t been easy. With regular liquid refreshment running low and visits to the shops even for essentials, limited, I’ve been resorting to retirement gifts stored away for a rainy day. The Balvenie Doublewood 12 Year Old Malt was much enjoyed in relieving it’s packaging for alternative use as an anamorphic cylindrical pincam. This image was also on Harman Direct Positive Paper:
I am quite fortunate in living within very easy reach from home of woodland and open space which can be enjoyed in relative solitude. Lockdown restrictions here allow for leaving home each day for one form of exercise, maintaining social distancing. Whether going for a walk or a cycle ride it is quite possible to pack one or two pinhole cameras for when I pause for a rest!
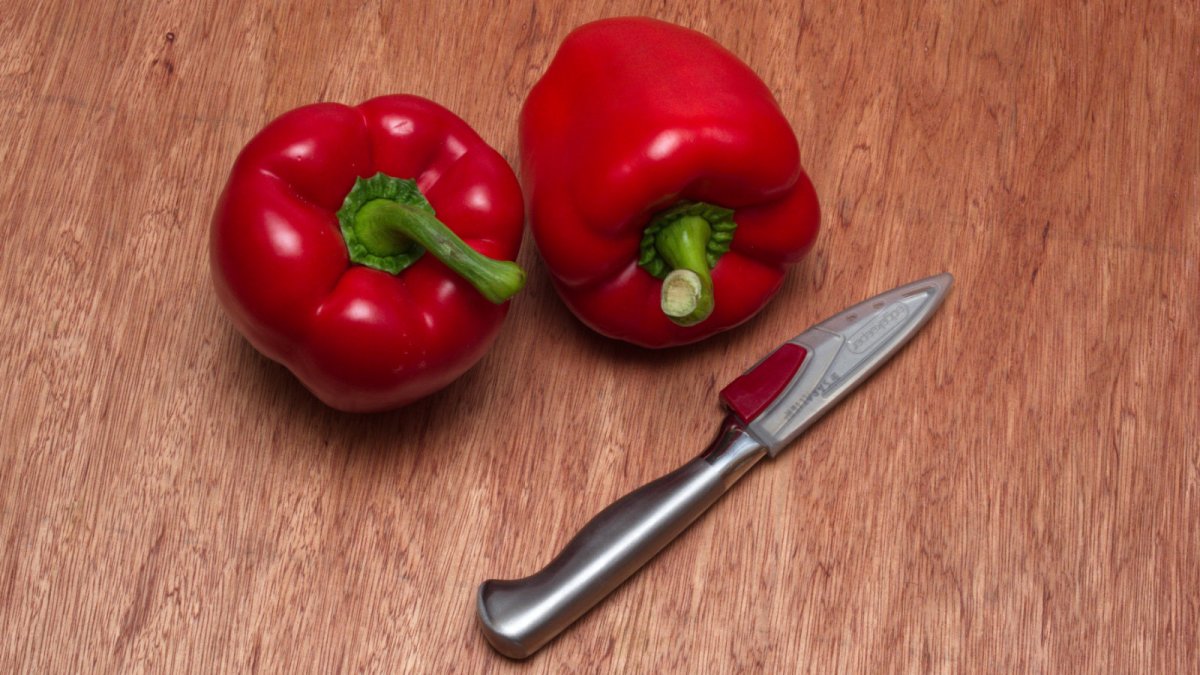
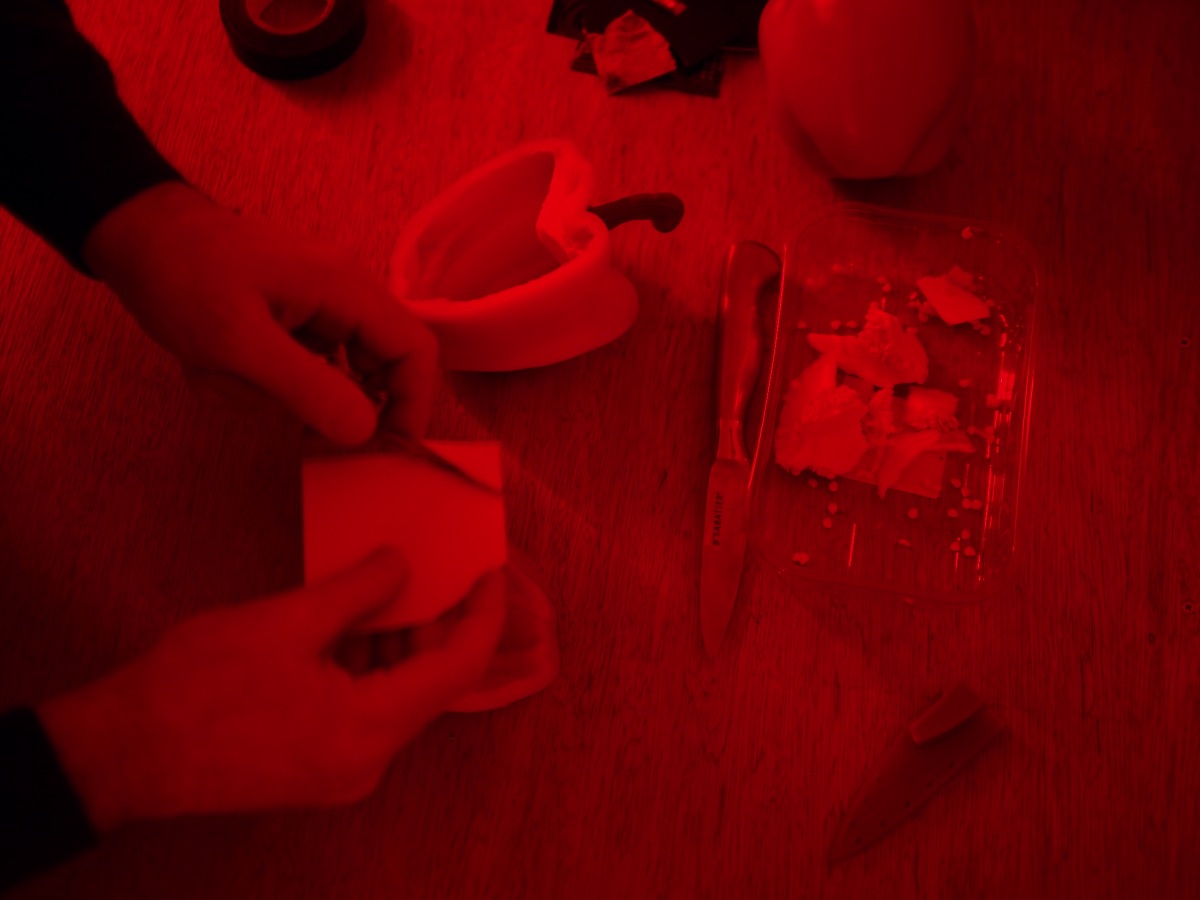
What? … A camera made from a red pepper? … OK, why not?
A red pepper. Not a green one or a yellow one, a red one and the redder the better. Why? Because the colour of the skin will act as a filter and if the pepper can be loaded with media that can be handled in a darkroom with a red safelight, such as photo paper, the pepper should provide safelight darkroom conditions.
I had to give it a go! This is how I made my first red pepper pincam:
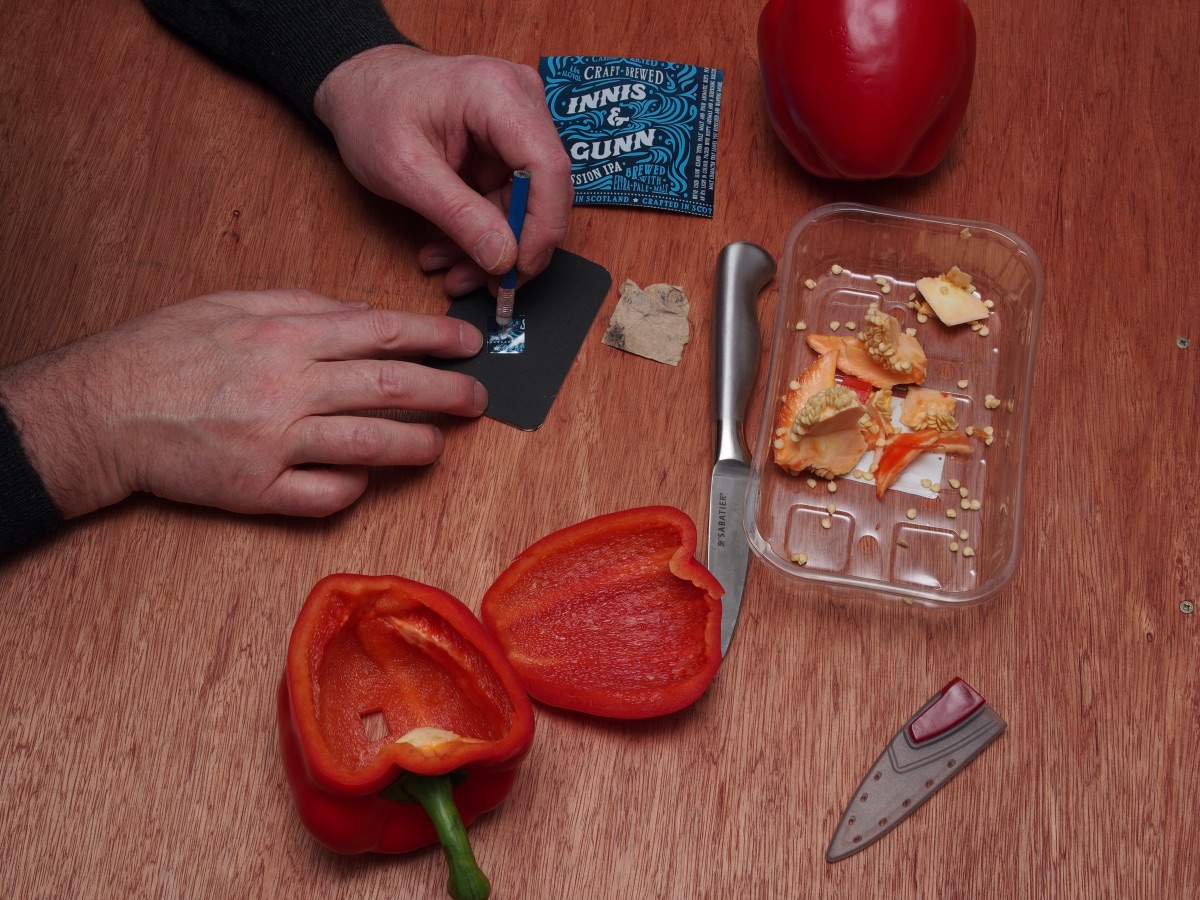
Carefully slice through the pepper so that the slice can be stuck back on later.
Remove the core and seeds
Cut a hole opposite the entrance. This is where the pinhole will go.
Check that the back will fit. Note where the pinhole will go.
Cut a square of aluminium and punch a small pinhole.
Attach the pinhole to the pepper with black PVC electrical tape.
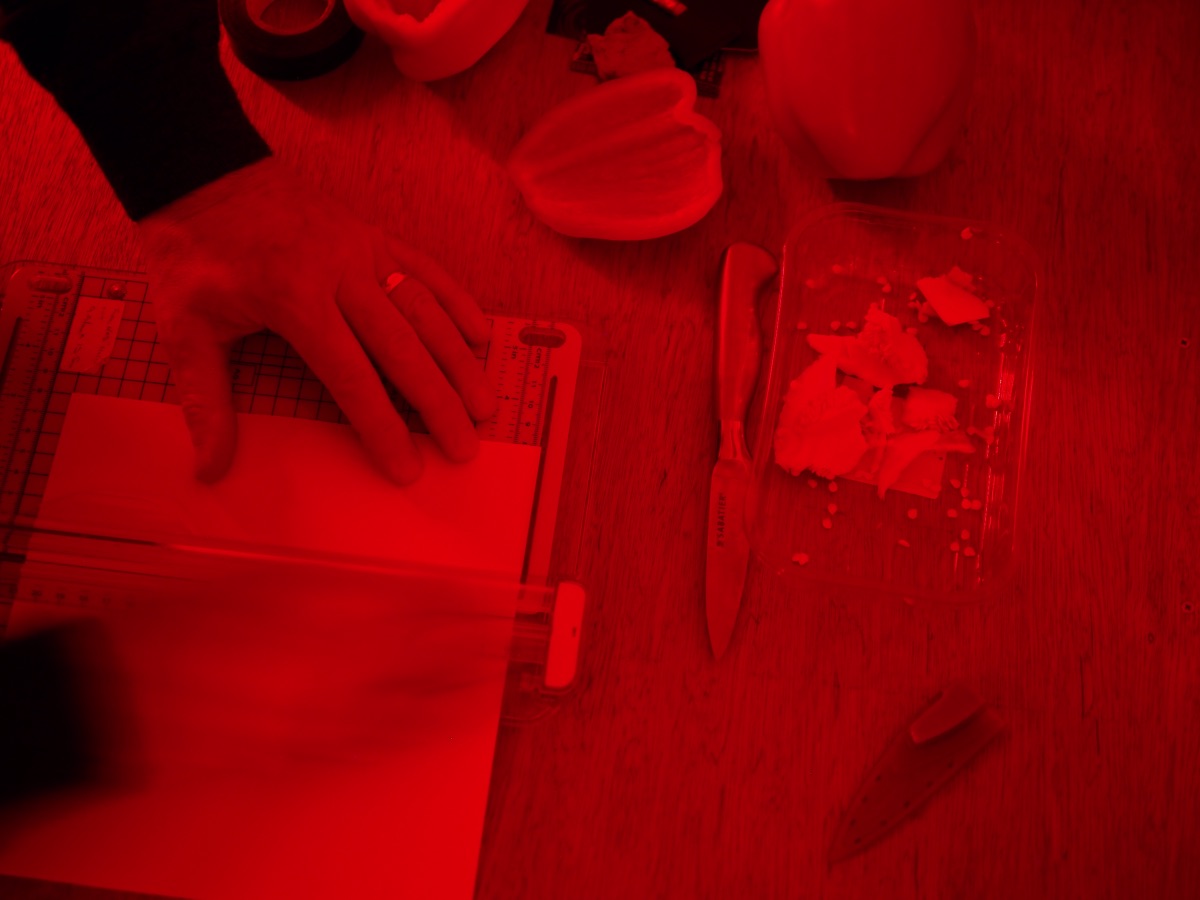
(Safelight conditions) Cut a piece of photo paper to fit across the slice cut in the pepper.
(Safelight conditions) Trim the photo paper to the shape of the pepper.
(Safelight conditions) Sandwich the paper in the gap and seal the slice to the pepper with PVC electrical tape.
Electrical tape is light tight and sticks well to the pepper.
Attach a piece of electrical tape over the pinhole to act as the shutter.
With the pincam made, all I needed was enough light to try it out. The projection distance is about 60mm and the pinhole diameter about 0.4mm so my effective aperture is f/150 or thereabouts. The weather has been wet, windy and dull. Very, very dull. I waited a day but the weather remained very, very dull so on my workbench I set up a pile of empty photo paper boxes and the second red pepper as a still life, lit it with a powerful LED worklight and made an exposure.
Still life set up for trial exposure
Five minutes later I had a paper negative in the developer …
Red pepper pincam paper negative
and here it is scanned, inverted, flipped with some levels tweaking:
I’d been concerned firstly that moisture from the pepper would contaminate the image but although there was some slight staining, the paper came out remarkably clean.
Secondly, there was a risk that the electrical tape would not seal sufficiently and allow light leaks but it adhered well. After 24 hours it held together and there is little evidence of light leaks.
Thirdly, would the red skin of the pepper do the business as a safelight? It did! There are interesting markings on the negative that coincide with natural markings on the surface of the pepper that I think are quite cool but the pepper did the job!
I kept a second pepper until the results from this one were known. I’ll be waiting for beter weather and a more exciting choice of subject matter to set it up.
A recent spell of miserably dull weather where every colour was less exciting than a palette of nothing other than 18% grey had me rooting around the garage to find something to keep me out of mischief.
I found an offcut from a wooden plank, carefully put aside for one of those ‘just-in-case’ moments. It was 100mm wide and 28mm thick. Now for those whose brains are so wired, 100mm is also the width of 4″x5″ sheet film and 28mm is a fine pinhole projection distance. My brain must be so wired – I immediately saw a pinhole project to occupy my time!
Pinhole ploy inspired by a plank of wood!
Initially , my plan was to cut the plank into 125mm lengths and drill through it as large a hole as I could find a hole saw to do the job. I had some spare foam core from which to make a tray into which I could place a sheet of film or paper. The block of wood would be secured over it to form the camera body. The drilled out hole would have a pinhole secured in place and use a piece of electrical tape for a simple shutter.
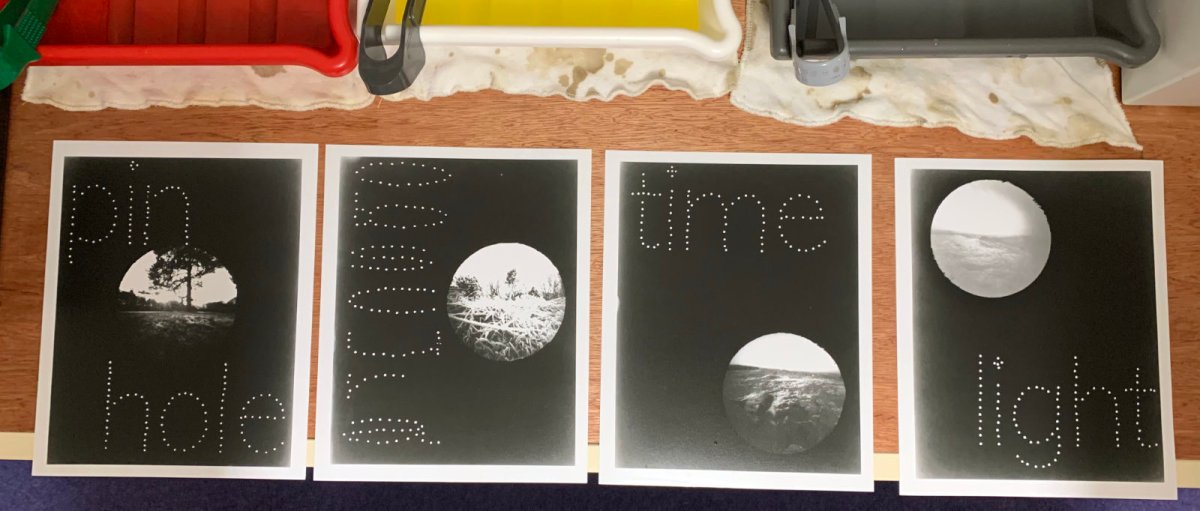
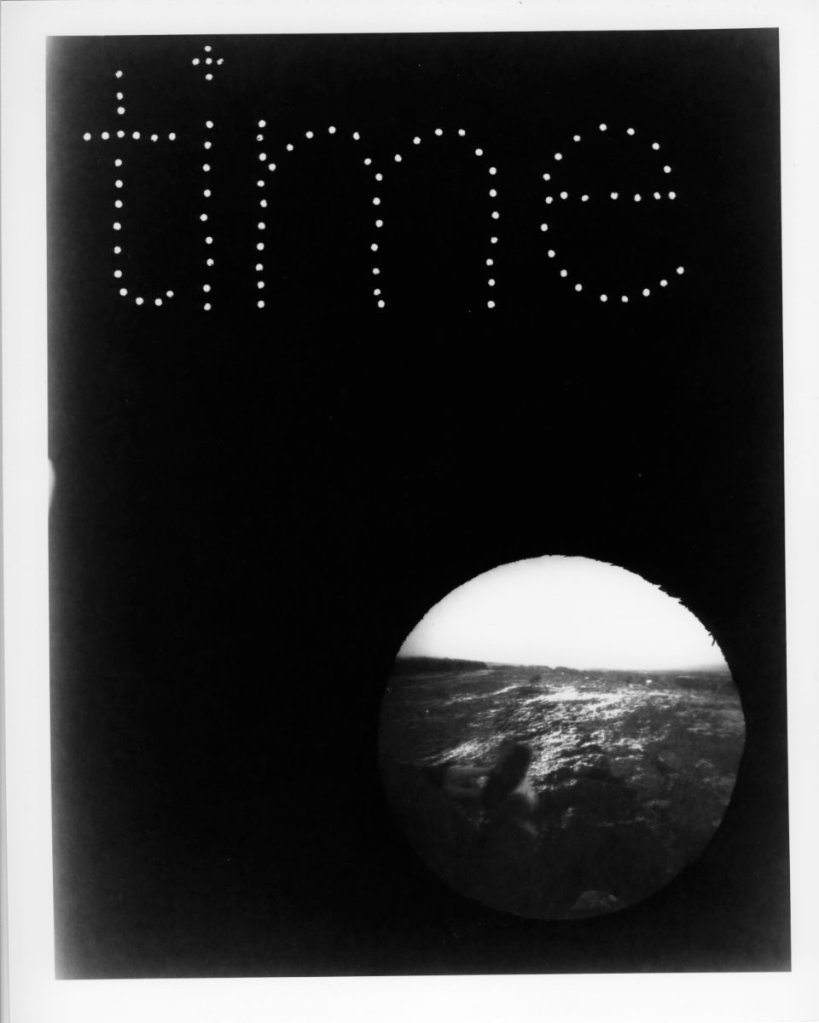
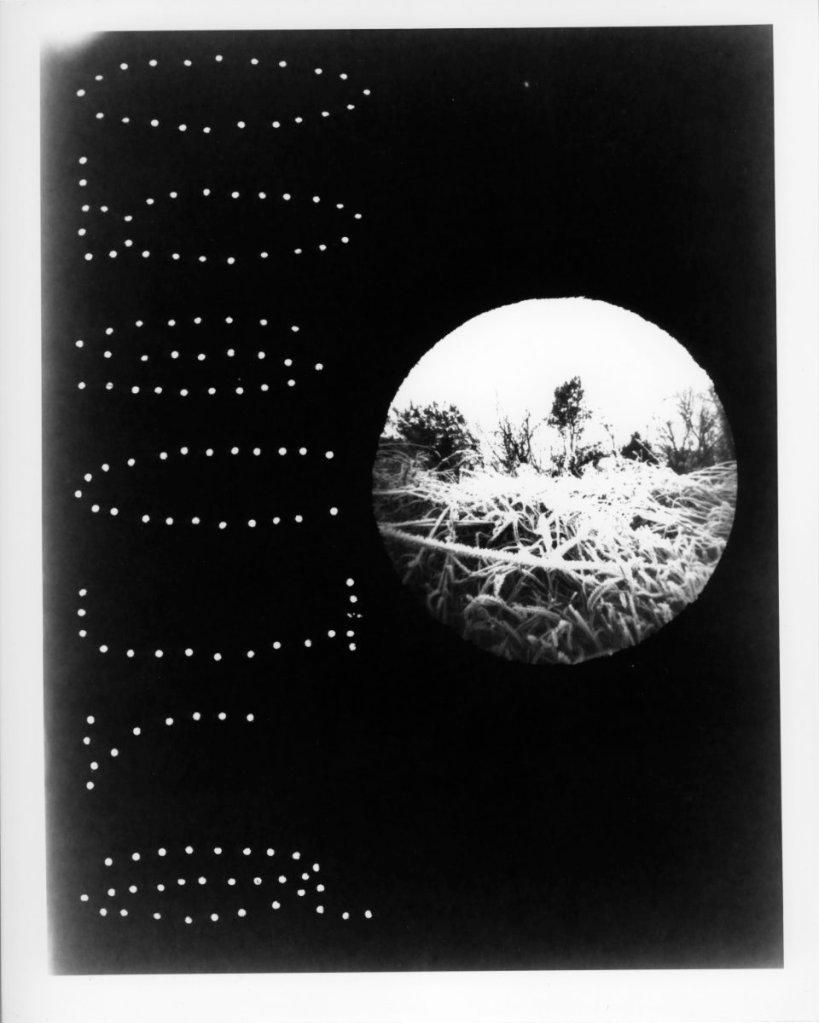
As can be seen from the photograph above, I had sufficient wood and foamcore to make four cameras, each with its own film tray. However as I was cutting the wood my idea developed: I would prepare a template to stick onto some mat board and drill through to create pinhole-related words with pinhole dots. A second copy of the template would position the large hole and be pinned or nailed to the front of the wooden block to support the pinhole and shutter.
I would then make two exposures: First, the word-drilled template held against the film or paper would be exposed under the light of my enlarger. Then the template would be replaced with the wooden camera block and a regular pinhole exposure made, although I would have to wait for an improvement in the weather for that second stage!
I’ve had the enlarger attachment for my Intrepid camera for a few months but haven’t used it, finding setting it up on my tripod just too much hassle. I’ve been looking for a decent copy stand to use and struck lucky a couple of weeks ago, finding a Kaiser stand on Amazon described as having cosmetic damage and being offered for substantially less than half the going rate for a new one. I took a chance and was rewarded with a packaging-damaged, as-new copy stand. I took me quite a while to find the cosmetic damage: a slight ‘bruise’ on the corner of the base-board. It was a good buy and now I am able to use my Intrepid Enlarger for the first time to make the first exposures for my new pinhole cameras.
Kaiser RS1 Copy Stand and Intrepid with enlarger attachment set up and ready to go.
Bad weather never lasts and this weekend I got out in crisp, bright conditions to try out my new pinhole cameras. I’m running out of both film and printing paper and an order placed earlier in the week has been delayed. I found at the bottom of a box, a couple of sheets of MGIV RC satin paper that I cut to size for paper negatives and in another box was half a dozen sheets of Kentmere Select VC lustre that I could use for printing. I had to make do with just a couple of sheets cut up for test strips and had only one shot at making a final print from each negative! With that in mind, I’m pretty pleased with the results below and the knowledge that refinement can be made in future.
I set out to discover, through a pinhole, images of the landscape left behind as I travel through it on my bicycle.
For some years I’ve been intrigued by the idea of moving a pinhole camera through the landscape to discover what images might be revealed. One of the first such images I made was in 2014 with my then new Harman TiTAN 4×5 pinhole camera. Taken through the front window of the top deck of a bus as it followed a cyclist along a busy Edinburgh street, the cyclist was rendered relatively recognisable in a streaked world of mystical shapes. It was an image that time and again has me taking a pinhole camera out for an adventure in time travel through the landscape.
Two years ago I blogged such an adventure with the pincam mounted behind the windscreen of my car (http://pinhole-time-travel). At other times I’ve carried a pincam as I walked or ran but the one thing that I could never quite work out was how to mount a pincam on my bicycle such that I could operate it while on the move.
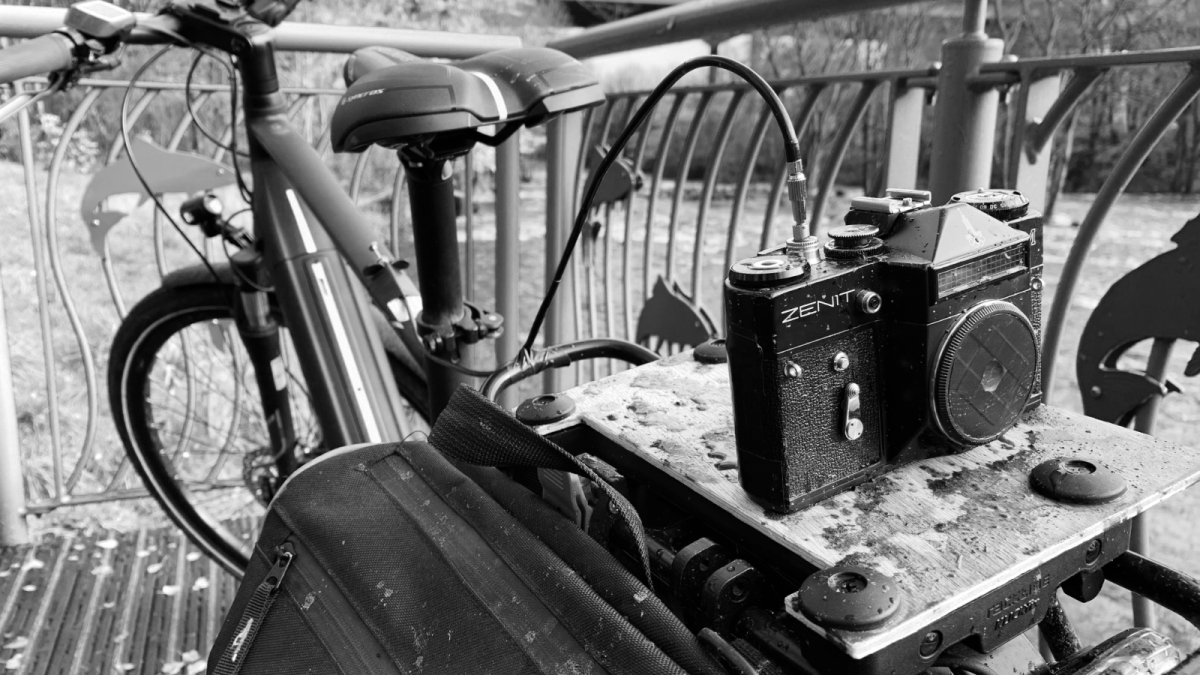
The answer came to me a couple of months ago and gave me a new perspective for the image – I could mount a 35mm camera fitted with a bodycap pinhole to a board fixed to the pannier rack and operate it on the ‘B’ setting by a long cable release threaded through the frame and attached to the crossbar!
That the camera would face backwards to where I had been rather than forward to where I was going seemed appropriate to the idea of photographing what has been. The moment we think of as ‘now’ immediately becoming the past as it passes into memory (I sometimes wonder whether ‘now’ ever exists at all) and the long exposure of the pinhole image blurring the memory as so often happens in the mind.
My first attempt was with an old Zenit camera. It’s shutter has been dodgy for ages, slow and often sticking, but the ‘B’ setting worked – or at least it did! The vibration on the bike was too much for it. Although several successful frames were made, it was curtains for the shutter. My attempts at repair were to no avail but I had been prepared to make the sacrifice. With lessons learned I changed the Zenit for an Olympus OM1, this time with some cushioning and I’m pleased to say that the OM1 is going strong after a couple more outings.
The images may not be to everyone’s taste but they work for me! Getting the exposure ‘correct’ has been and continues to be a challenge. Scanning the Kentmere 400 negatives produced files that I found unworkable but I picked a few frames to print on Ilford MGIV FB glossy paper (all I have at the moment). Without further comment, these are what follow:
Testing the sensitivity of Direct Positive Paper to my darkroom safelight.
In my previous post, The Bin-cam pincam, https://donaldtainsh.wordpress.com/2019/10/09/the-bin-cam-pincam/ I created a pinhole camera from a redundant food-waste caddy and exposed a sheet of Harman Direct Positive Paper (DPP). The resulting image was fogged and I subsequently set out to discover the source of the problem.
The paper had been loaded in my darkroom under the glow of my red safelight. It is an AP ‘Dark Red’ light, basically a mains powered 15W lamp with an appropriately coloured plastic cover. I have previously found that DPP can be fogged by over exposure to the safelight but have never attempted to quantify the ‘problem’.
Furthermore, the plastic of which the food-waste caddy is constructed is well weathered and I wanted to assess if and by how much the opacity of the plastic had been affected by the weathering.
I started with a 10″x8″ sheet of DPP from the same pack as had been used for the original image. In total darkness I cut it into approximate 5″x4″ sheets, two to be used for testing, one as a control and one as a spare.
My first test was to expose one sheet in the darkroom as a test sheet at five-minute intervals. The safelight was positioned 2 metres away, just above the level of the test strip gadget. When developed, I was surprised at how sensitive to the red light DPP was:
It may not show too clearly here but just five minutes was enough to visibly fog the paper!
In complete darkness I placed a second sheet inside the Bin-cam pincam and put the camera outside in bright autumnal daylight for three hours. The lid and shutter remained closed for the duration of the test. This sheet was developed and compared against the above test strip and the third sheet which was developed completely unexposed.
Again, it may not show clearly here, but there is visible fogging of the ‘exposed’ sheet compared to the unexposed control sheet, comparable with the 5-minute test strip.
The paper of the original Bin-cam image was exposed to the safelight for two to three minutes while being loaded and the exposure was made in bright sunlight. From my tests, the paper would have been fogged to some extent both by the safelight and the less than perfect opacity of the camera.
With the knowledge I now have, I can take steps to minimise fogging in future, primarily in loading the paper but perhaps also making some alteration to the camera with paint or lining paper.
… Or I can live with it and find pleasure in serendipitous imperfection!
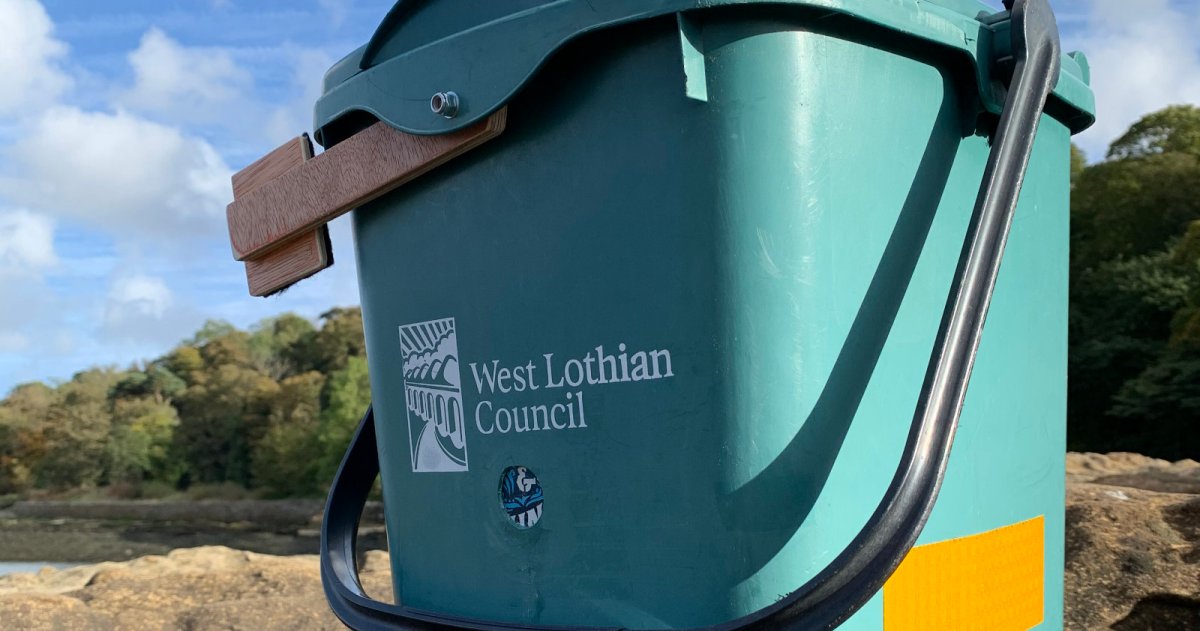
How I recycled a redundant food-waste caddy as a pinhole camera.
My local council recently made some changes to our waste recycling collections. Food waste would no longer be collected separately but would instead be put in the garden waste bin. However, residents were told that the redundant food-waste caddy would not need to be returned.
I couldn’t not recycle it and let it go to waste!
The food caddy is a simple moulded plastic design with fixings for the handle and the hinge for the lid being part of the moulding. So apart from the lid opening, there are no holes in the container. Furthermore the lid, which is locked in place by the rotation of the handle, closes over a raised lip on the container’s top edge. The construction is perfect for adaptation as a pinhole camera and the internal size just about right to take a 10″x8″ sheet of photo paper.
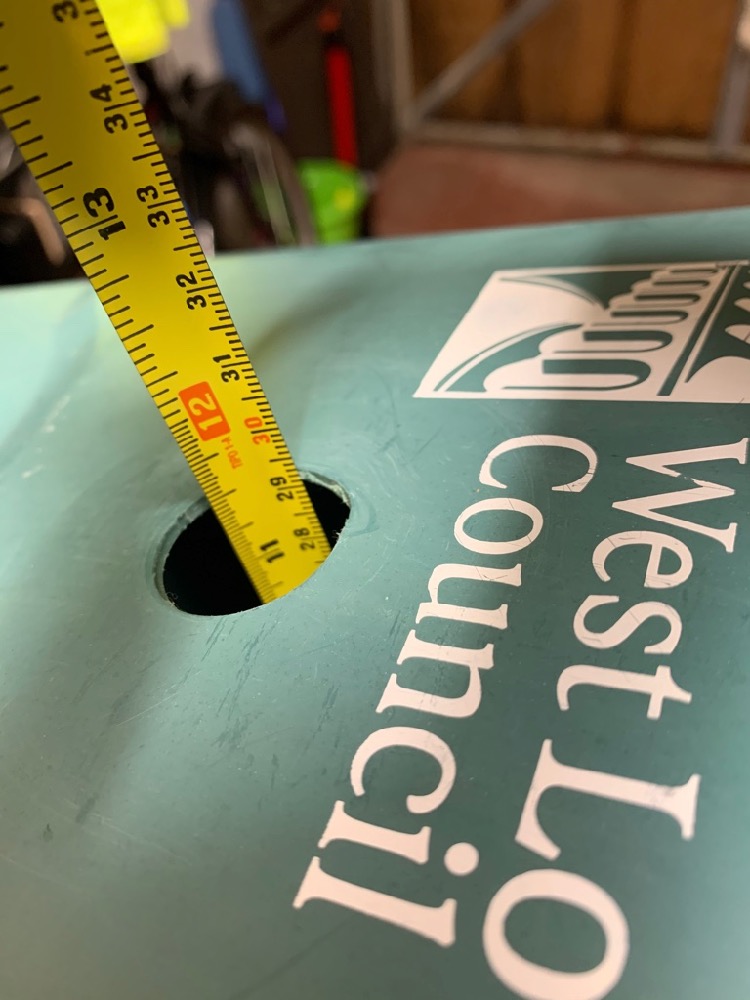
I reckoned it only needed a hole to be drilled over which a pinhole could be fitted, something to ensure the top lip would function as a light seal, and a shutter mechanism fitted.
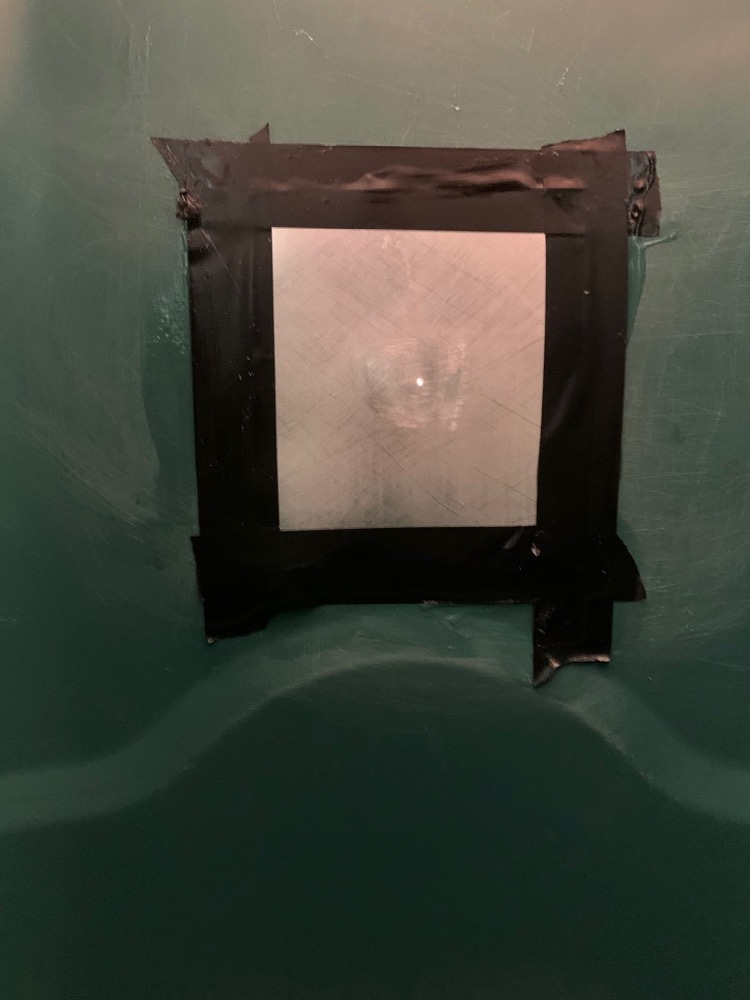
With a piece of paper taped in place I worked out the best position to drill a 25mm diameter hole in the front of the bin. Once drilled, I measured the projection distance and used Pinhole Assist to calculate the ideal pinhole diameter.
The optimal pinhole diameter of 0.72mm is a bit wider than my pin cams usually require (0.3 to 0.5mm) and needed a wider pin than I am accustomed to using. However I found a larger pin and punched first-time a clean hole which measured 0.79mm, checked by high resolution scan, in aluminium cut from a beer can. The pinhole was fixed in place inside the bin with glue and electrical tape, later reinforced with duct tape.
I stuck strips of sticky-backed black foam to the inside of the lid where it would close on the moulded lip of the container. Initially, I had intended to use black electrical tape as a shutter but the tape wasn’t adhering well to the plastic surface of the bin. I decided to craft something more elegant from offcuts of plywood and sticky-backed black felt. A handle moulded as part of the front edge of the container provided a pivot point that I could drill through without going through the container wall.
All that was left to do was to test it. My favourite location for testing new cameras is Queensferry and the Forth Bridge. I took advantage of a convenient brief sunny interlude and with the help of Pinhole Assist, gave a sheet of Harman Direct Positive Paper a 7min 36secs exposure.
Here’s a straight scan of the result. There’s some fogging but the image is well exposed and pleasingly sharp (I never expect or look for sharpness in a pinhole image!). I’ve had issues with fogging DPP in the past and need to work out whether this was due to over exposure to red safelight when loading, to less than perfect opacity of the (well weathered) plastic from which the bin is made, or a combination of the two. There’s nothing in the image to suggest light leaks which I would expect to see as specific areas or streaks of over exposure.
With the benefit of scanning and thus having a digital file to play with, this is what a little tweaking of the histogram produced.
Pinhole images through a vortoscope: Is it a first?
Worldwide Pinhole Photography Day (WPPD) is celebrated annually on the last Sunday of April. For several years I’ve joined my friends in the Edinburgh Lo-Fi Photography Group for a pinhole photowalk and trying each year to do ‘something different’ with a light-tight space, some form of light-sensitive media and a very, very, small hole.
While the ultimate goal in celebrating the Day is to produce a single image that will be uploaded to the WPPD website, it is also a fun, social occasion with friends, a sharing of ideas, coffee, an interesting location, cake, pincam comparisons and inevitably food and drink in a pub or restaurant afterwards. To make the day interesting photographically I usually prepare several pincams and this year I carried three. My intention was to make one pre-planned image for WPPD19 and to simply have fun with the others to see how they turned out.
First was the ‘Not Just Any Belgian Collection Biscuit Tin’ pincam, then came the ‘All Butter Scottish Shortbread Collection Penta-pinhole’ pincam and finally, the ‘Olympus OM1n Vortoscopic Bodycap Pinhole’ pincam. Each will be explained below in some detail. (This will be a long blog post)!
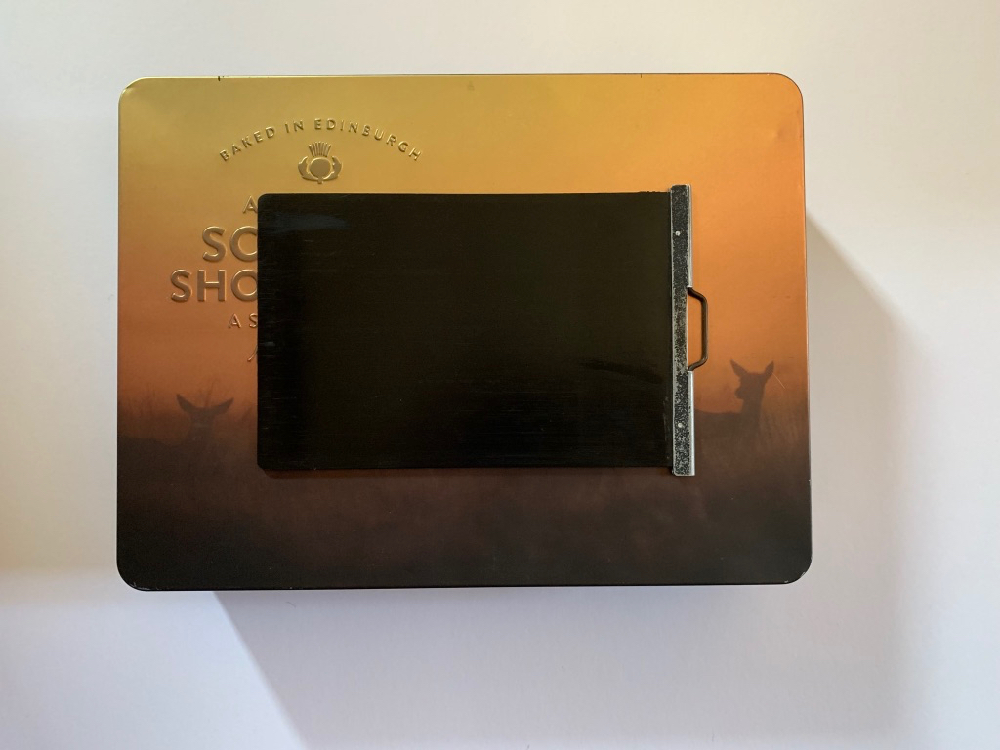
The Not Just Any Belgian Collection Biscuit Tin pincam
Choose one pinhole from three … the lower landscape pinhole is uncovered
I last used this 90mm deep biscuit tin which holds a sheet of 10″x8″ paper, a few months ago while experimenting with SE1 emulsion on tracing paper. The success of that experiment was iffy at best but it did confirm the accuracy of the f/360 pinhole apertures (it has three to choose from) and the angles of view achievable. It seemed a safe bet to put it to use for WPPD19 loaded with a sheet of Harman Direct Positive Paper which would subsequently be developed in fresh Ilford Multigrade.
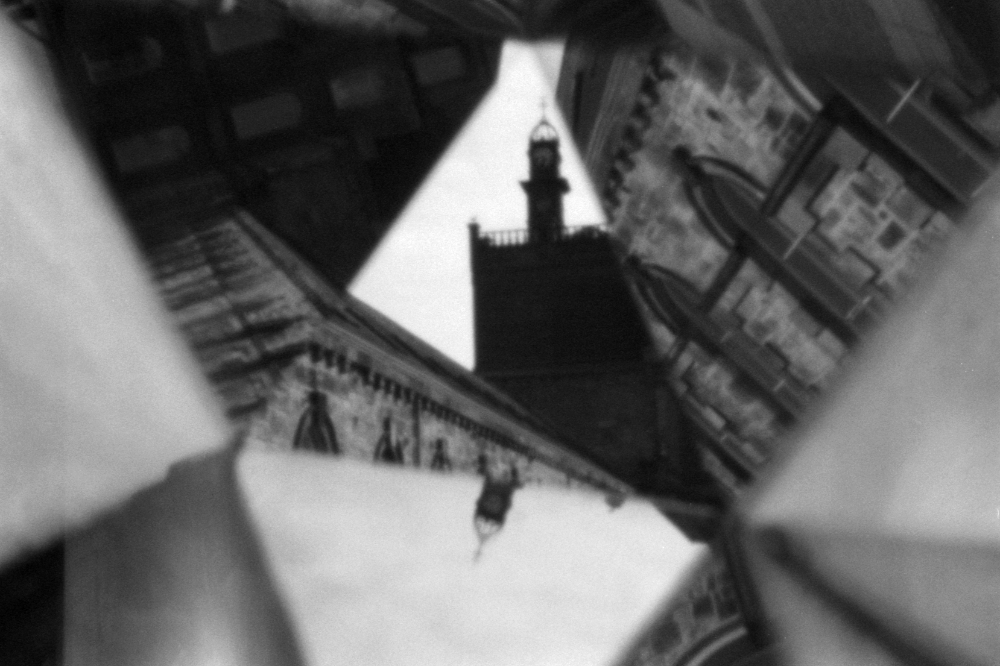
Our walk passed a large concrete arrow set in the grass. Apparently the arrow had served some purpose to the RAF during the second world war. It seemed an ideal subject for pinhole imagery. I set up the pincam on a high tripod, aiming downward and used the lower landscape pinhole so as to raise the horizon and include the shadow of the pincam in the image.
Using the lower landscape pinhole together with the pincam aimed downwards ensures the inclusion of the pincam’s shadow.
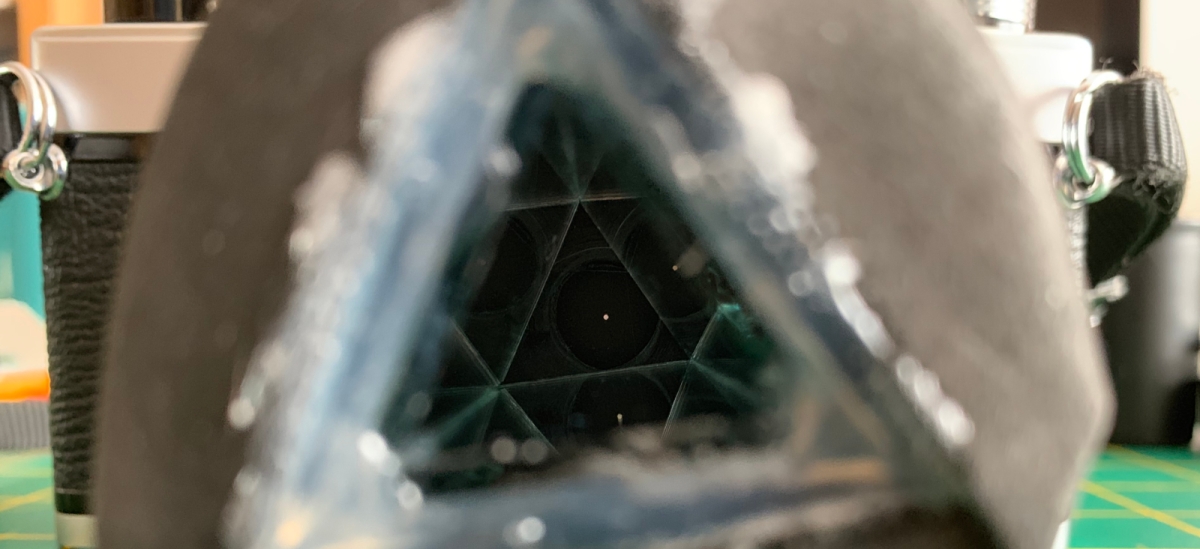
The All Butter Scottish Shortbread Collection Penta-pinhole pincam
The shutter is an old 5″x4″ darkslide fitted with high-density foam and magnetsFive pinholes concurrently uncovered to provide five overlapping image planes
Like the Belgian Biscuit tin, this pincam had been last used in my experiments with emulsion on tracing paper. It is much shallower at only 55mm and although very wide, the angle of view of each pinhole is insufficient to cover the 10″x8″ paper that fits inside the tin. By using multiple apertures light would be projected by the peripheral ones into the areas of the paper unexposed by the central one. This would also create the interesting idea of overlapping image planes.
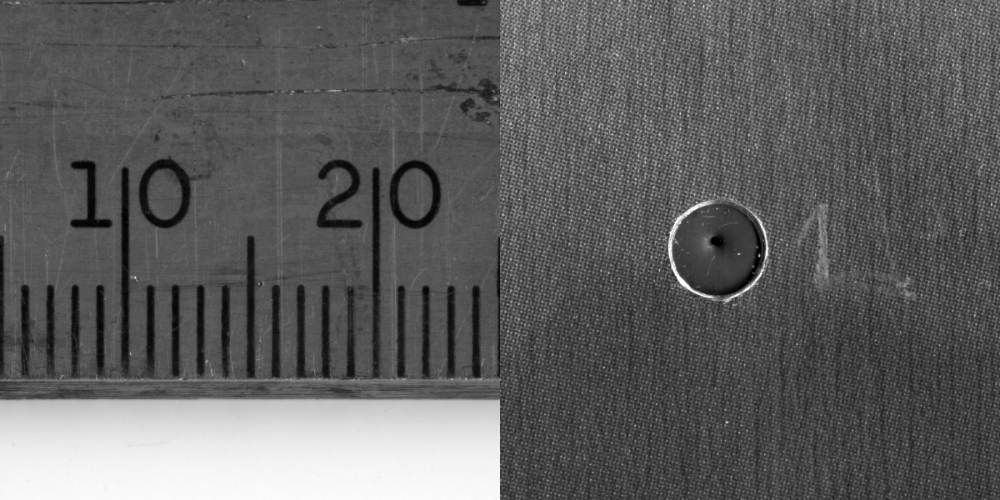
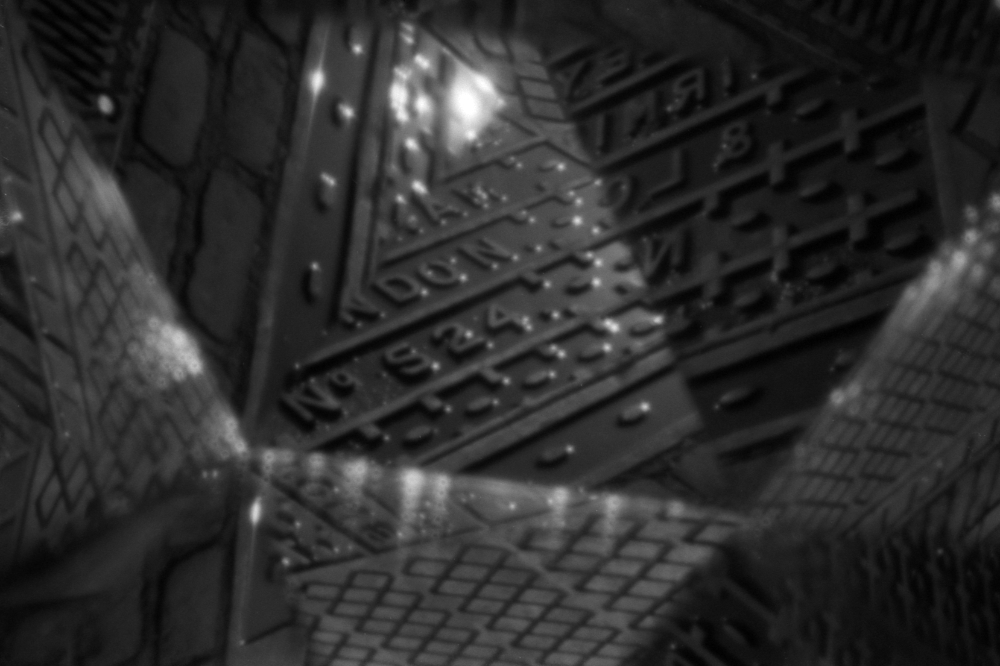
The challenge would be to produce five near identical pinhole apertures. This would ensure evenly balanced exposures in the periphery while the central area would receive light from all five apertures. From experiments with three holes I reckoned I could meter the subject, divide by five and deduct that well-known pinhole unit of measure: the ‘bit’. I marked out and drilled holes in the tin lid. The f/160 pinhole apertures were created by pushing a dress-making pin part-way through squares of thin aluminium foil which were then measured for accuracy and consistency before attachement to the inside of the tin. Measurement was made by scanning each pinhole at 9600dpi, measuring onscreen at full size and comparing against the known measurement of a steel rule scanned and viewed at the same resolution and size.
steel rule vs pinhole. Scanned at 9600dpi and viewed on screen at full size, surprisingly accurate measurements can be made for consistency across several pinholes
The twist I wanted to put on the image made with this camera was based on the fact that the meeting point to start our walk was to be outside a theatre. Now the universal symbol for the theatrical arts is a mask and with the potential for the overlapping image produced by this pincam to ‘mask’ the subject, I thought I would take it a little further and make a mask for a member of our group to wear while posing for my WPPD19 image!
a simple papier-mache mask with a few splashes of acrylic paint
Unfortunately the person I had in mind (whose ‘big’ wild hair would have set off the mask very well) was unable to attend the meetup so I ended up wearing it myself and taking a selfie! I quite underestimated just how close the pincam to subject distance would need to be: this was taken at about 30cm – it really needed to be half that or even closer!
Not quite as intended – the jury’s out on whether this is worthy of WPPD19 submission.
The Olympus OM1n Vortoscopic Bodycap Pinhole pincam
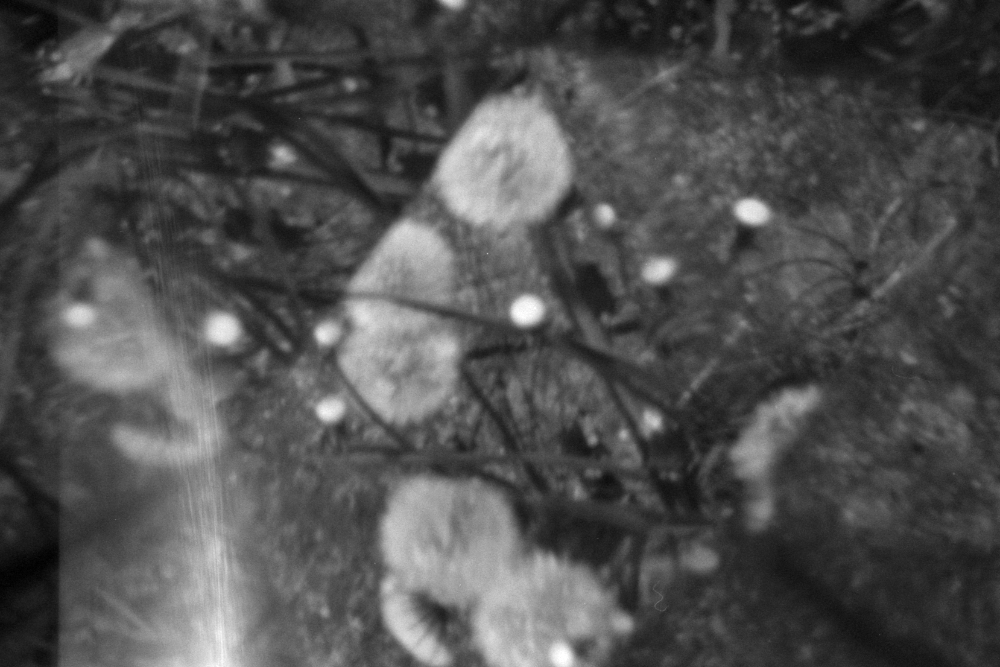
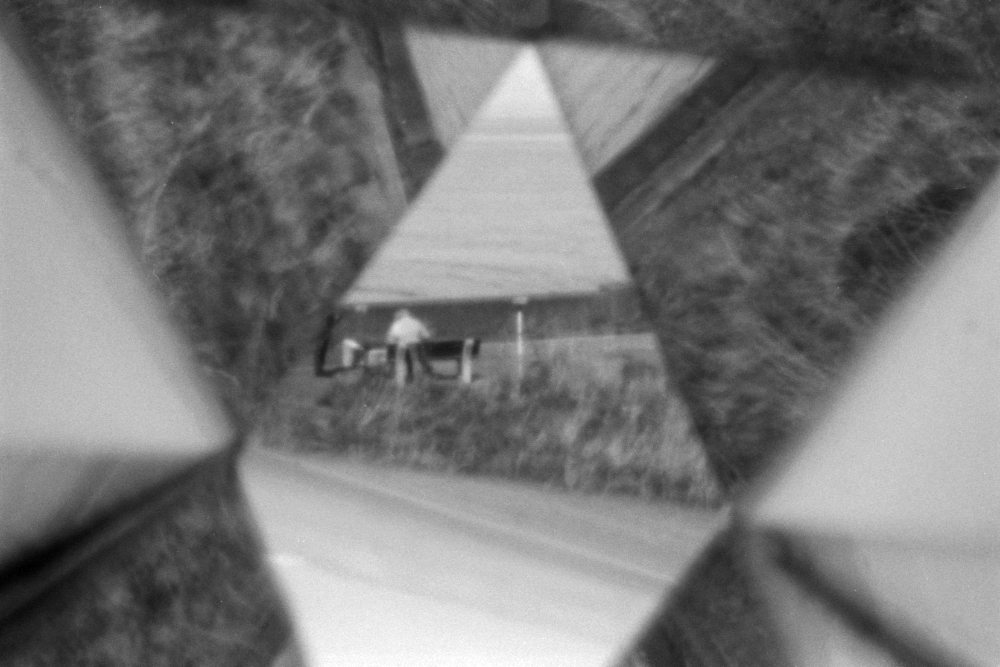
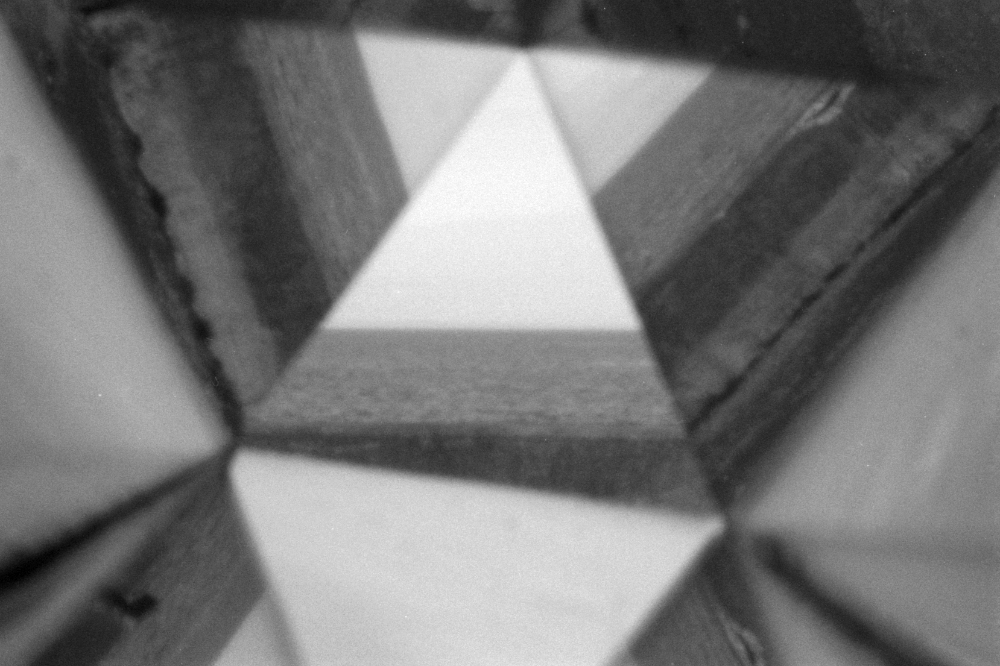
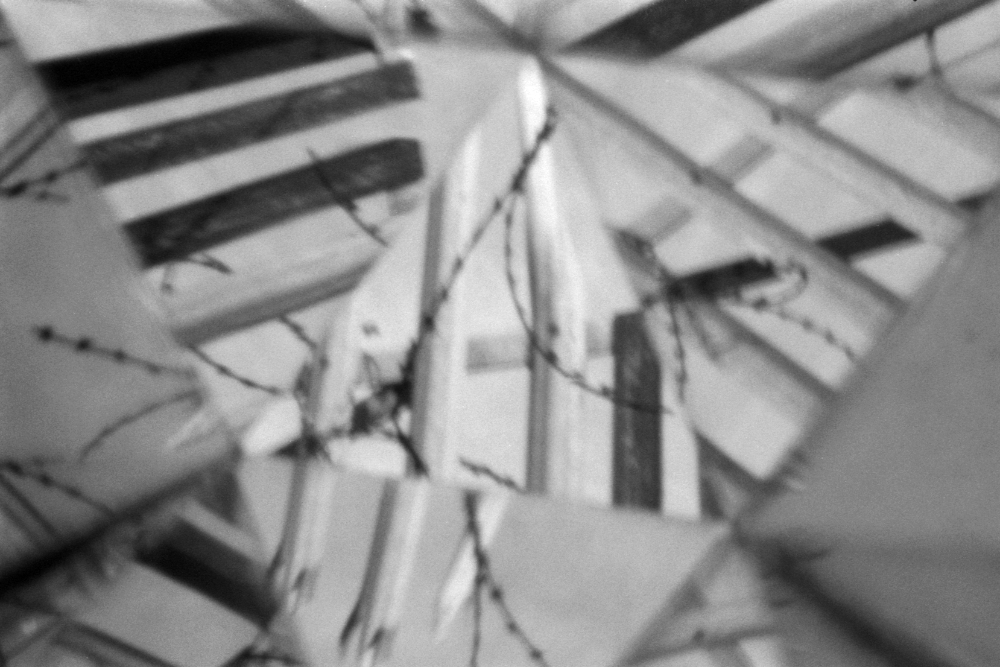
It was while browsing my local craft store for mask materials that I spotted some 5cm square mirrors. Some years ago I had been introduced to vortographs, an interesting technique that once tried quickly found its way to the dark recesses of my memory. Something clicked and I decided it would be fun to make a vortoscope through which to make pinhole images. (A good starting point to learn about vortoscopism is https://en.wikipedia.org/wiki/Alvin_Langdon_Coburn)
A vortoscope is a gadget that produces kaleidoscope-like images. It is made up of three (I guess it could be more) mirrors formed into a tube-like construction of triangular section which is placed over a lens (or in my case, over a pinhole aperture). The resulting image consists of a central direct section surrounded by peripheral reflections. The ‘diameter’ and length of the vortoscope affects the size and clarity of each of these sections and the abstraction of the image.
I made mine from a pack of 5cm square mirrors which I cut to size with a glass-cutter, a toilet roll core, copious amounts of hot-melt glue and some sticky-back foam. The bodycap has long been adapted for pinhole but to be sure I did re-make the pinhole aperture to the optimum 0.29mm for the 49mm projection distance when mounted on my old Olympus OM1n camera.
I was pretty pleased with the results. The camera was loaded with Kentmere 400 film from a bulk roll and subsequently developed in Ilfosol 3. I make no apology for showing all of the images here, warts and all, because I think they are quite cool! These have been scanned and slight adjustments made in Afinity Photo for exposure and levels. Most of the images were between half and one and a half stops underexposed which was probably down to my poor metering!
WPPD19: which image to submit?
At the time of writing, I have not yet decided which of all the pinhole images made on the day I should submit as my WPPD19 image. I’m open to suggestions.
Pinhole day this year was the first in a long time that I can remember having good, almost too good, weather for pinhole photography. It was unusual for me to come home with nothing I could call a failure!
The best thing about the day? Time spent with friends, sharing our enjoyment of simple image-making pleasures.
A final anecdote
We came across many bird watchers, apparently drawn to reports of two rare species of duck having been spotted along the coast where we were walking. Like us, each of them carried the tools of their hobby: while ours were tin cans and changing bags, theirs were tripods, spotting scopes and big digital cameras with huge long lenses surely capable of resolving the tail-feather detail of sparrows in flight at 1000 metres!
One of them was passing me when he spotted the Olympus round my neck: “Oh! What sort of lens is that? I’ve not seen one of these before.” he asked. Willing to be engaged in a spot of photographic gear talk I removed said ‘lens’ from the camera to show the pinhole end of the device. “It’s not a lens, it’s a vortoscopic bodycap pinhole.” I replied.
Oh dear! The clues were written all over his face. This conversation was going nowhere. It was quite clearly considered that I was some wacko with a screw loose! I need to invest time in the study of ornithology.


You must be logged in to post a comment.